Is your mini PC slow, running out of memory with several tabs open, or slow to start programs?
Adding more RAM is the cheapest and most effective upgrade you can make, and the best part: you don't need to be a techie to do it.
In this guide we explain the entire process step by step, from choosing the correct memory to turning on the device and verifying that everything works.
What is RAM and why does it matter?
RAM (Random Access Memory) is your computer's temporary workspace. Every time you open a program, document, or browser tab, it's loaded into RAM so the processor can access it quickly. When RAM is full, the system starts using the hard drive as a substitute (which is much slower), causing the typical slowdowns and stutters.
Upgrading the RAM in your mini PC can mean the difference between a slow and frustrating machine and a smooth and productive one, especially if you use multiple applications at once, edit video, or play games.
🔍 Before You Buy: What You Should Check
Not all RAM is compatible with all mini PCs. Before spending a penny, check these three points:
1. RAM Type: SO-DIMM (non-DIMM)
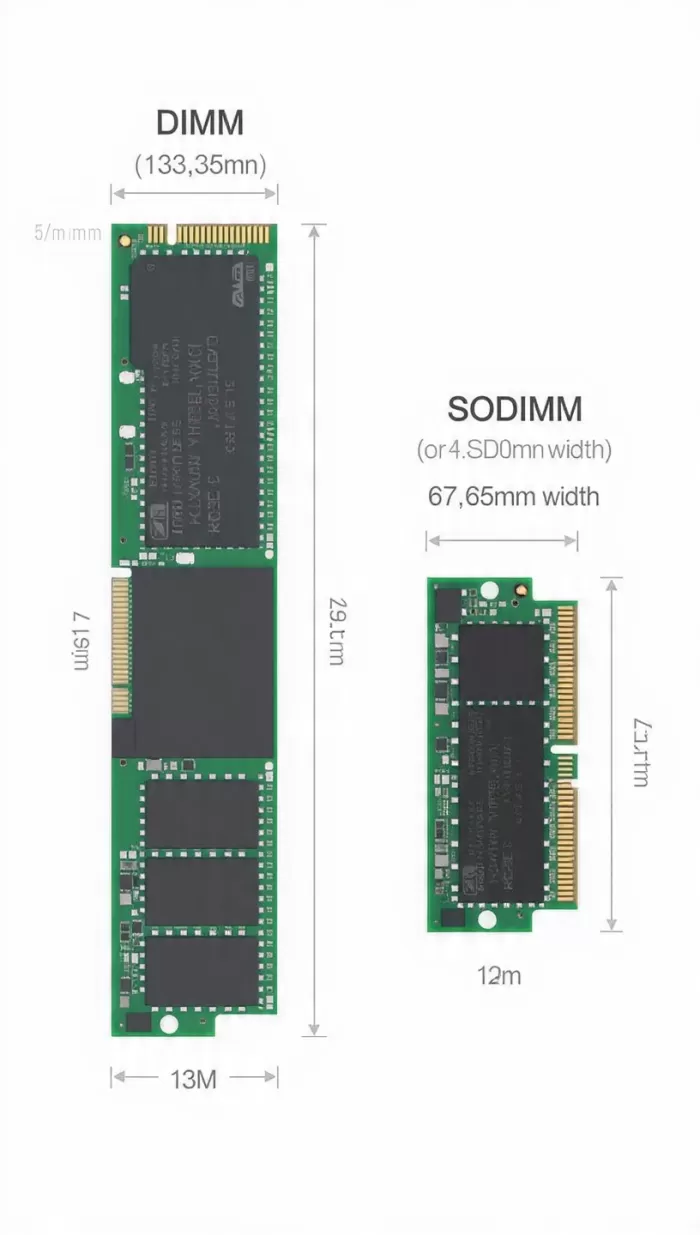
DIMM and SO-DIMM modules
Mini PCs use a smaller memory format called SO-DIMM, which is different from the standard DIMM found in desktop PCs. Visually, they are almost half the length.
The current types are:
-
DDR4 SO-DIMM: the most common type in current mini PCs (2020-2024). Typical speeds are 2400, 2666, or 3200 MHz.
-
DDR5 SO-DIMM: found in most modern mini PCs (2024-2026). It starts at 4800 MHz and goes up to 7200 MHz.
⚠️ DDR4 and DDR5 are NOT interchangeable. The slot has a notch in a different position to prevent inserting the wrong type. Consult your mini PC's manual or the manufacturer's specifications to determine which type yours uses.
2. Maximum supported capacity
Each mini PC has a RAM limit. Exceeding that limit won't "break" the computer, but the extra module simply won't be recognized. Check the official specifications for your model. Common examples:
| Mini PC | RAM included | Maximum supported |
|---|---|---|
| BMAX B5A Pro | 16 GB DDR4 | 64 GB (2× 32 GB) |
| Beelink SER5 Max | 16 GB DDR4 | 64 GB |
| Minisforum UM773 | 16 GB DDR5 | 64 GB |
| Intel NUC 13 | 16 GB DDR4 | 64 GB |
3. Number of available slots
Most mini PCs have two SO-DIMM slots. Some basic models only have one slot (in that case, you can only replace the module, not add one). Check if your computer comes from the factory with both slots occupied or just one.
💡 Dual-Channel Mode: The "Hidden" Upgrade
Here's a concept that many beginners are unaware of, but it makes a big difference: dual-channel mode.
When you install two identical RAM modules (same brand, capacity, speed, and latency), the processor can access both simultaneously, effectively doubling the memory bandwidth. The practical result is up to a 25% performance boost in gaming and graphics tasks compared to a single module.
Real-world example: A mini PC with Ryzen 7 and integrated GPU (like the BMAX B5A Pro) that comes from the factory with 1× 16 GB in single-channel, performs noticeably better if you change it to 2× 8 GB or add a second identical 16 GB module to activate dual-channel.
The golden rule: whenever possible, install RAM in pairs of identical modules.
🛒 Which RAM Module to Buy
For mini PCs with DDR4 (most common)
The best options in terms of value for money are:
-
Crucial SO-DIMM DDR4 3200 MHz — the most recommended option for compatibility and stability. ⇒ Check availability
-
Kingston ValueRAM SO-DIMM DDR4 3200 MHz — affordable and reliable. ⇒ Check availability
-
Samsung SO-DIMM DDR4 3200 MHz — premium quality, no unnecessary heatsinks. ⇒ Check availability
Recommended frequency: 3200 MHz (DDR4-3200). This is the current standard that most mini PCs natively support.
For mini PCs with DDR5 (2024-2026 models)
-
Crucial SO-DIMM DDR5 4800 MHz — more affordable input. ⇒ Check availability
-
Kingston Fury Impact DDR5 5600 MHz — price/performance balance. ⇒ Check availability
-
Corsair Vengeance DDR5 SO-DIMM — for those who demand maximum performance. ⇒ Check availability
💡 Buying tip: Always buy a 2-module kit (labeled as "2× 8 GB", "2× 16 GB", etc.) instead of two individual modules. The kits are tested together to work in dual-channel without compatibility issues.
🧰 Necessary Tools
Before you begin, prepare the following:
-
🔧 Small Phillips screwdriver (Philips PH0 or PH1)
-
🧲 Small container for storing screws (or adhesive tape)
-
✋ Antistatic wrist strap (highly recommended) or touch bare metal before touching components
-
💡 Good lighting
-
📱 Your mini PC manual (find the PDF on the manufacturer's website)
📋 Step by Step: Installing RAM in your Mini PC
Step 1: Turn off and completely disconnect the equipment
Shut down the mini PC from Windows (do not put it into hibernation or sleep mode) and unplug the power cord. Wait 30 seconds for the capacitors to discharge. Also disconnect all peripherals (keyboard, mouse, monitor, etc.).
Step 2: Open the case
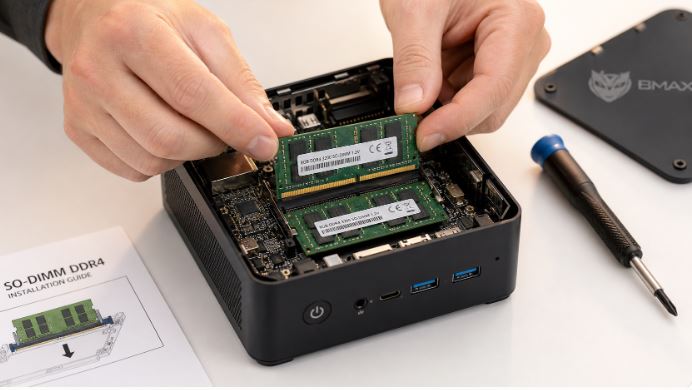
Most mini PCs open by removing two to four screws located on the bottom of the chassis. Some models may also have a screw hidden under a rubber seal or sticker. Once the screws are removed, the bottom cover will usually slide or lift off with a little pressure from your fingers. Keep the screws in a container so you don't lose them.
⚠️ If the cover doesn't come off easily, don't force it. Look for a disassembly video specific to your model on YouTube before prying it off.
Step 3: Locate the SO-DIMM slots
With the case open, identify the existing RAM modules. They are rectangular strips about 7 cm long with black chips on top, inserted into angled slots on the motherboard. They may be exposed or under a small protective sheet that can be easily lifted.
Step 4 (optional): Remove the current module
If you are replacing the existing module (for example, changing 1× 16 GB to 2× 16 GB) or adding a second module in the free slot, follow these steps:
-
Push outwards the two metal clips located at the ends of the module
-
The module will lift itself at an angle of about 30-45°
-
Slide it gently outwards in that angled direction
-
Never pull the module perpendicular to the slot
Step 5: Insert the new RAM module
This is the most important step. Do it calmly:
-
Remove the new module from its antistatic packaging by touching only the edges, never the gold contacts or the chips.
-
Note the small notch on the bottom edge of the module — it should align exactly with the protrusion of the slot
-
Align the module with the slot at an angle of about 30-45°
-
Gently push in all the way to the bottom
-
Press the module down (towards the motherboard) firmly but without hitting it.
-
The metal clips at the ends will snap into place with a small, audible "click".
-
Gently pull on the module to check that it is securely attached: it should not move.
✅ Success sign: The two side clips are completely closed and the module does not move when pulled.
Step 6: Install the second module (if applicable)
If you're installing two modules to enable dual-channel, repeat the exact same process in the second slot. Both modules should be at the same height and with the clips securely closed.
Step 7: Close the casing
Replace the bottom cover, aligning it correctly, and tighten the screws you removed. Do not overtighten them; tighten them only until they stop turning. Reconnect the peripherals and the power cable.
Step 8: Turn it on and check
Turn on the mini PC. The first boot may take a little longer than usual: this is completely normal, the system is recognizing the new memory.
To verify that the RAM has been installed correctly:
In Windows 11:
-
Click
Ctrl + Shift + Escto open Task Manager -
Go to the "Performance" tab → "Memory"
-
Check that the total capacity is correct (e.g., 32 GB if you installed 2 x 16 GB).
-
Verify that it says "Speed" and "Channels: Dual" to confirm dual-channel
Using CPU-Z (free):
Download CPU-Z, go to the "Memory" tab and check that the "Channel #" field shows "Dual".
🌡️ Common Problem Solutions
If your mini PC doesn't start or doesn't recognize the new RAM, don't worry. Follow these steps:
| Problem | Probable cause | Solution |
|---|---|---|
| Won't start / black screen | Module incorrectly inserted | Open and firmly reinsert both modules |
| It only recognizes half of the RAM. | Defective or incompatible module | Try each module separately |
| Dual-channel not active | outdated BIOS | Update the BIOS from the manufacturer's website |
| Unstable system or blue screens | Modules of different specifications | Use identical modules or modules from the same kit |
| BIOS shows RAM at a lower speed | XMP/EXPO not activated | Enable the XMP/EXPO profile in the BIOS |
💡 If the system does not boot with two modules but does with one, try cleaning the gold contacts of the module with a soft eraser and reinsert it.
❌ Common Mistakes You Should Avoid
These are the most common mistakes inexperienced users make:
-
Buy DDR4 for a computer that uses DDR5 (or vice versa). Always check the type before buying.
-
Randomly mixing modules of different speeds or brands will cause the system to downgrade all modules to the slowest one, which can lead to instability.
-
Install a single high-capacity module instead of two smaller ones. A single 32GB module operates in single-channel mode; two 16GB modules operate in dual-channel mode for better performance.
-
Avoid touching the gold contacts on the modules. Finger grease can cause connection problems.
-
Do not disconnect the power supply before handling components.
-
Force the module inwards. If it doesn't go in smoothly, it's probably rotated 180°.
📊 How Much RAM Do You Really Need?
| Use | Recommended RAM | Grades |
|---|---|---|
| Navigation, basic office automation | 8 GB | Sufficient for light use |
| Multitasking, streaming, remote work | 16 GB | The current recommended standard |
| Casual gaming, light photo/video editing | 16-32 GB | Dual-channel essential |
| Development, virtualization, video editing | 32-64 GB | More is always better here |
| Servers, workstations | 64 GB+ | Only for DDR5 or specific boards |
🔧 What about Dual-Channel on the Integrated GPU?
This point is especially important for mini PCs with integrated AMD Radeon GPUs (Vega, RDNA 2/3). Unlike dedicated graphics cards, iGPUs share system RAM. The more bandwidth that RAM has (and dual-channel doubles it), the better graphics performance you'll get.
In practice, enabling dual-channel on a mini PC with Ryzen 7 can mean:
-
⬆️ +20-25% FPS in games
-
⬆️ Improved emulation performance (PS3, Switch)
-
⬆️ Improved performance in tasks with hardware video encoding
❓ Frequently Asked Questions (FAQ)
Can I mix RAM from different brands?
Technically, yes, if they have exactly the same speed (MHz) and latency (CL). But the safest and most recommended option is to use a kit of two modules from the same manufacturer and model.
Do I need to reinstall Windows after upgrading my RAM?
No. Windows automatically detects the new memory without needing to reinstall or configure anything.
Does upgrading the RAM void the mini PC warranty?
On most mini PCs on the market (especially those from Chinese brands like BMAX, Beelink, or Minisforum), upgrading the RAM and SSD does not void the warranty, as they are designed to be user-upgraded. Even so, check the specific terms and conditions from your manufacturer.
What happens if I buy RAM faster than my mini PC supports?
The system will run it at the maximum speed it supports, without any issues. The price difference between 3200 MHz and 3600 MHz DDR4 is minimal, so 3200 MHz is the logical choice for mini PCs.
Is the RAM installed in a mini PC the same as in a laptop?
Yes. Both use the SO-DIMM format, so the modules are completely interchangeable between mini PCs and laptops of the same DDR generation.
How long does installation take?
Between 10 and 20 minutes for someone with no prior experience. Once you've opened the device a couple of times, the entire process takes less than 5 minutes.
🏁 Conclusion
Upgrading the RAM in a mini PC is one of the simplest, cheapest, and most effective upgrades you can make. With a screwdriver, 10 minutes, and between €25 and €60 for a SO-DIMM module, you can double or quadruple your computer's memory and notice the difference from the first boot.
The only essential requirement is to check the compatible RAM type (DDR4 or DDR5) and respect the maximum limit of your mini PC. Otherwise, simply follow the steps in this guide calmly and without rushing.
🛒 Where to Buy SO-DIMM RAM for Mini PC
| Module | Guy | Ability | Approx. price | Link |
|---|---|---|---|---|
| Crucial SO-DIMM | DDR4 3200 MHz | 16 GB | ~30-35€ | 🛒 Crucial SO-DIMM |
| Kingston ValueRAM | DDR4 3200 MHz | 16 GB | ~28-32€ | 🛒 Kingston FURY |
| Crucial SO-DIMM Kit | DDR4 3200 MHz | 2 x 16 GB | ~€55-65 | 🛒 Crucial RAM DDR4 |
| Kingston Fury Impact | DDR5 5600 MHz | 16 GB | ~€45-55 | 🛒 Kingston Fury DDR5 |